Sobre mim
Sobre mim

- Membro do PHPSP
- Entusiasta em cibersegurança
- Desenvolvedor há 15 anos
- Consultor e instrutor de treinamentos em TI
Preparação
Preparação
Para acompanhar a palestra, siga os passos a seguir:
-
Clone esse repositório:
$ git clone --recursive \ git@github.com:vcampitelli/workshop-kubernetes.git -
Acesse os slides abrindo
docs/index.htmlem seu navegador - Instale o Docker em docs.docker.com/get-docker
- Instale o minikube em minikube.sigs.k8s.io
-
Entre na pasta
scriptse execute:$ minikube start --kubernetes-version=v1.26.3
Microsserviços
Microsserviços
A variant of the SOA structural style – arranges an application as a collection of loosely-coupled services. In a microservices architecture, services are fine-grained and the protocols are lightweight.Wikipedia
Microsserviços
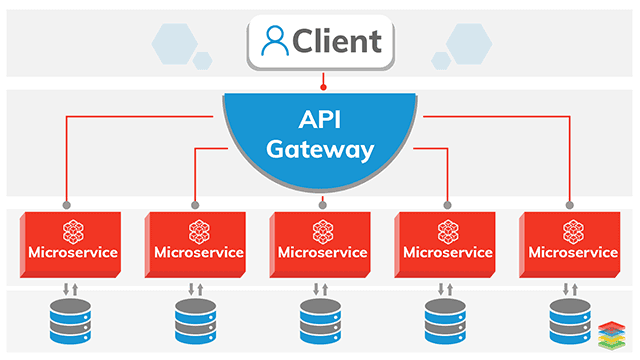
embarcados.com.br
Containers
Containers
Containers are an abstraction at the app layer that packages code and dependencies together. Multiple containers can run on the same machine and share the OS kernel with other containers, each running as isolated processes in user space. Containers take up less space than VMs (container images are typically tens of MBs in size), can handle more applications and require fewer VMs and Operating systems.Docker
Containers
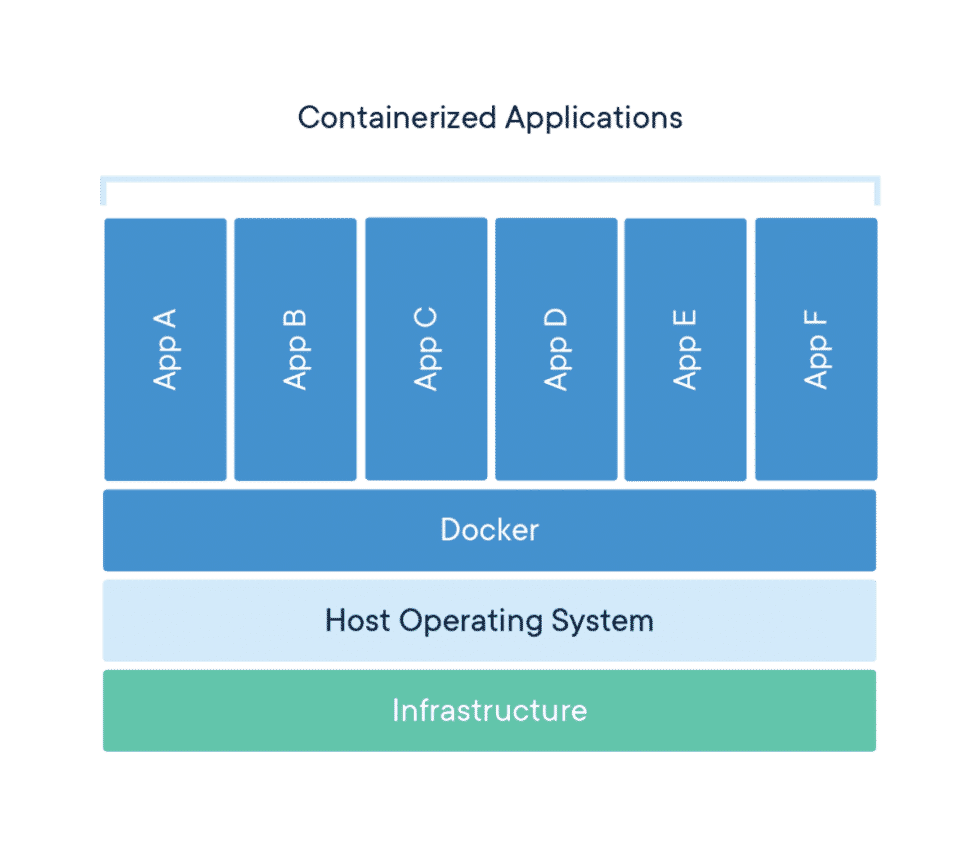
Docker
Kubernetes
Kubernetes
Kubernetes, also known as K8s, is an open-source system for automating deployment, scaling, and management of containerized applications.kubernetes.io
Kubernetes
Anunciado em 2014 pelo Google e mantido desde 2016 pela Cloud Native Computing Foundation , suporta diversos runtimes de execução de containers, como containerd, CRI-O e qualquer implementação do CRI
kubernetes.ioKubernetes
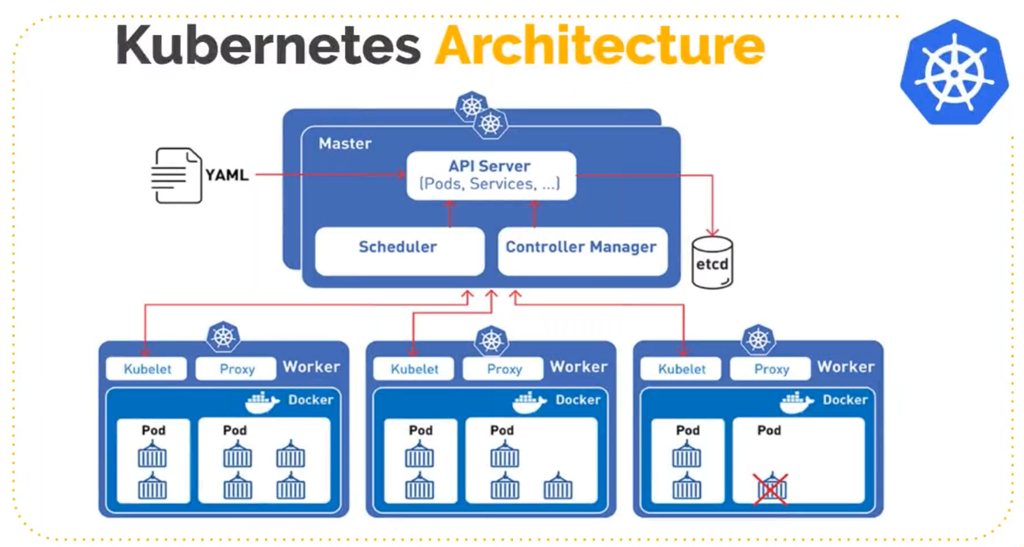
C#Corner
Kubernetes
Pods
Pods are the smaller deployable units of computing that you can create and manage in Kubernetes.
Pod is a group of one or more containers, with shared storage and network resources, and a specification for how to run the containers. A Pod's contents are always co-located and co-scheduled, and run in a shared context.kubernetes.io
Kubernetes
Deployment
A Deployment provides declarative updates for Pods and ReplicaSets.kubernetes.io
You describe a desired state in a Deployment, and the Deployment Controller changes the actual state to the desired state at a controlled rate. You can define Deployments to create new ReplicaSets, or to remove existing Deployments and adopt all their resources with new Deployments.
Kubernetes
Service
An abstract way to expose an application running on a set of Pods as a network service.
In Kubernetes, a Service is an abstraction which defines a logical set of Pods and a policy by which to access them (sometimes this pattern is called a micro-service).kubernetes.io
Kubernetes
Cluster
Conjunto de servidores de processamento, chamados nós, que executam aplicações containerizadas.
Todo cluster possui ao menos um servidor de processamento (worker node), que hospeda os Pods.
Em ambientes de produção, o ambiente de gerenciamento geralmente executa em múltiplos computadores e um cluster geralmente executa em múltiplos nós (nodes) , provendo tolerância a falhas e alta disponibilidade.kubernetes.io
Kubernetes
Hands-on
Kubernetes
Hands-on
Instalando o minikube
Siga a documentação oficial em
minikube.sigs.k8s.io
para instalar o minikube de acordo com seu sistema operacional
Para ambientes Linux com arquitetura amd64, os comandos são:
                            $ curl -LO https://storage.googleapis.com/minikube/releases/latest/minikube-linux-amd64
                            $ sudo install minikube-linux-amd64 /usr/local/bin/minikube
Kubernetes
Hands-on
Iniciando o cluster
Clone ou atualize este repositório:
                            $ git clone --recursive \
                                git@github.com:vcampitelli/workshop-kubernetes.git
Entre na pasta scripts e inicialize o cluster com:
$ minikube start --kubernetes-version=v1.26.3
Kubernetes
Hands-on
Deploy do cluster
O minikube cria um serviço separado do Docker, então sempre que iniciarmos um terminal e quisermos interagir diretamente com ele, devemos especificar que queremos executar os comandos nesse ambiente:
$ eval $(minikube -p minikube docker-env)
Kubernetes
Hands-on
Deploy do cluster
Execute os comandos abaixo para fazer o build das imagens do Docker:
                            $ docker build -t auth:0.0.1 auth
                            $ docker build -t posts:0.0.1 posts
                            $ docker build -t comments:0.0.1 comments
                            $ docker build -t composition:0.0.1 composition
Kubernetes
Hands-on
Deploy do cluster
Agora, vamos começar a configurar as nossas aplicações:
                            $ minikube kubectl -- create \
                                -f k8s/00-jwt.yml \
                                -f k8s/01-auth.yml \
                                -f k8s/01-posts.yml \
                                -f k8s/01-comments.yml \
                                -f k8s/01-composition.yml
Kubernetes
Hands-on
Deploy do cluster
Para acompanhar tudo que foi configurado:
$ minikube kubectl -- get pods,services,deployments
Kubernetes
Hands-on
Acessando os serviços
Como não há um serviço de Load Balancing no minikube, devemos expor os
IPs dos services para eles serem acessados localmente
Execute o comando abaixo em um novo terminal e mantenha-o rodando:
$ minikube tunnel --cleanup
Kubernetes
Hands-on
Acessando os serviços
Volte ao terminal anterior, espere alguns segundos até que os três
EXTERNAL-IPs estejam alocados e execute o comando a seguir:
                            $ minikube kubectl -- get services
                            NAME                  TYPE           CLUSTER-IP       EXTERNAL-IP      PORT(S)          AGE
                            auth-service          LoadBalancer   10.106.141.164   <pending>        80:32110/TCP     5m
                            comments-service      LoadBalancer   10.102.133.17    <pending>        80:30921/TCP     5m
                            composition-service   LoadBalancer   10.99.218.84     <pending>        80:32527/TCP     5m
                            kubernetes            ClusterIP      10.96.0.1        <none>           443/TCP          5m
                            posts-service         LoadBalancer   10.106.220.106   <pending>        80:32532/TCP     5m
Kubernetes
Hands-on
Acessando os serviços
Volte ao terminal anterior, espere alguns segundos até que os três
EXTERNAL-IPs estejam alocados e execute o comando a seguir:
                            $ minikube kubectl -- get services
                            NAME                  TYPE           CLUSTER-IP       EXTERNAL-IP      PORT(S)          AGE
                            auth-service          LoadBalancer   10.106.141.164   10.106.141.164   80:32110/TCP     5m
                            comments-service      LoadBalancer   10.102.133.17    10.102.133.17    80:30921/TCP     5m
                            composition-service   LoadBalancer   10.99.218.84     10.99.218.84     80:32527/TCP     5m
                            kubernetes            ClusterIP      10.96.0.1        <none>           443/TCP          5m
                            posts-service         LoadBalancer   10.106.220.106   10.106.220.106   80:32532/TCP     5m
Kubernetes
Hands-on
Acessando os serviços
Para facilitar, vamos guardar os IPs com as portas em variáveis:
                            $ export URL_AUTH=http://10.106.141.164
                            $ export URL_COMMENTS=http://10.102.133.17
                            $ export URL_COMPOSITION=http://10.99.218.84
                            $ export URL_POSTS=http://10.106.220.106
Dica: você pode usar o script urls.sh para fazer isso automaticamente:
$ eval $(./urls.sh)
Kubernetes
Hands-on
Acessando os serviços
Para se autenticar na aplicação, execute o comando abaixo:
$ curl -X POST -u "admin:admin" "${URL_AUTH}/auth"
Resultado:
                            {
                              "access_token": "eyJhbGciOiJFUzI1NiJ9.eyJzY29wZXMiOlsidXNlcnMiLCJwb3N0cyIsImNvbW...",
                              "expiration": "..."
                            }
Kubernetes
Hands-on
Acessando os serviços
Salve o access_token em uma variável para facilitar as próximas chamadas:
$ TOKEN="eyJhbGciOiJFUzI1NiJ9.eyJzY29wZXMiOlsidXNlcnMiLCJwb3N0cyIsImNvbW..."
Dica: execute o script token.sh para fazer isso automaticamente:
$ eval $(./token.sh)
Kubernetes
Hands-on
Acessando os serviços
Teste os serviços:
                            $ curl -H "Authorization: Bearer ${TOKEN}" "${URL_POSTS}/posts"
                            $ curl -H "Authorization: Bearer ${TOKEN}" "${URL_COMMENTS}/comments"
                            $ curl -H "Authorization: Bearer ${TOKEN}" "${URL_COMPOSITION}"
Acompanhe os logs:
$ minikube kubectl -- logs -f -l app
Kubernetes
Hands-on
Configurando o Autoscaling
Ative o plugin de Metrics para coletar dados do uso de recursos:
$ minikube addons enable metrics-server
Abra um novo terminal e aplique a regra de Autoscaling:
$ minikube kubectl -- apply -f k8s/02-hpa.yml
Kubernetes
Hands-on
Configurando o Autoscaling
Abra um novo terminal e execute o comando abaixo para acompanhar o status:
$ watch -n 1 "minikube kubectl -- get hpa"
Também é possível rodar este comando para visualizar o histórico de ações:
$ minikube kubectl -- describe hpa posts
Kubernetes
Hands-on
Configurando o Autoscaling
Baixe o wrk para realizar requisições simultâneas e execute:
                            $ wrk -t4 -c300 -d30s \
                                -H "Authorization: Bearer ${TOKEN}" \
                                "${URL_POSTS}/posts"
PS: esse comando irá abrir 300 conexões distribuídas em 4 threads durante 30 segundos.
Ajuste esses números para atender às especificações de sua máquina.
Service Mesh
Service Mesh
É uma camada dedicada de infraestrutura para facilitar a comunicação entre serviços usando um proxyWikipedia
Service Mesh
Propõe uma gestão mais eficaz das comunicações entre serviços, maior controle operacional e também o fornecimento de informações comportamentaisWikipedia
Service Mesh
Algumas funcionalidades
- Encriptação;
- Load balancing;
- Observabilidade;
- Rastreabilidade;
- Circuit breaker;
- Autenticação e autorização.
Service Mesh
Visão geral
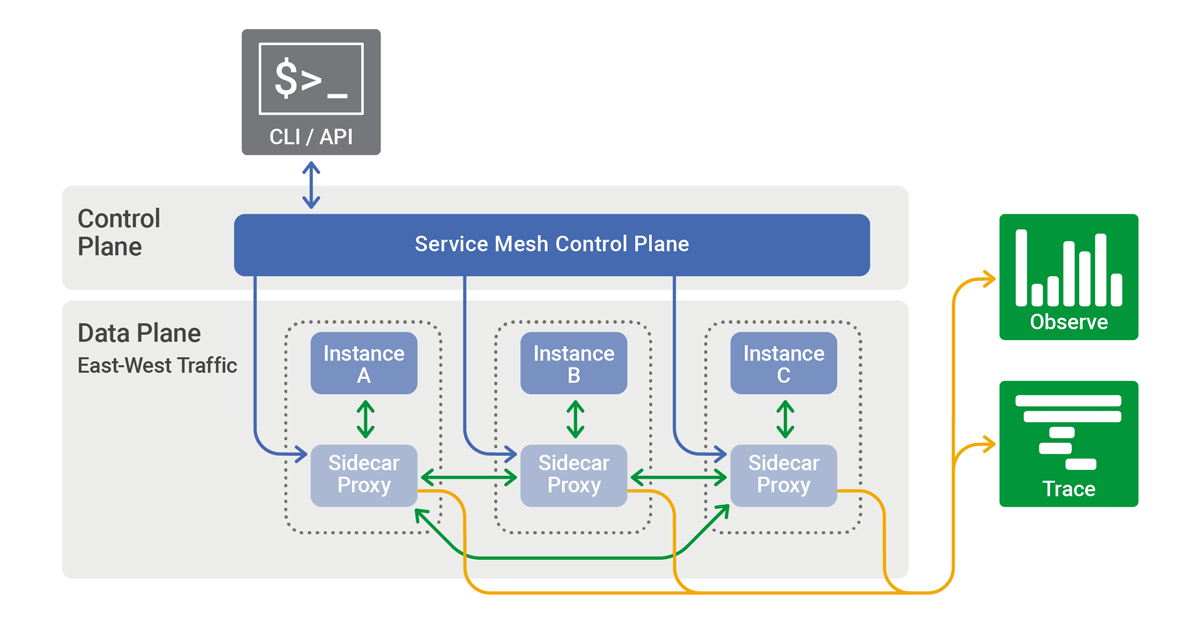 nginx.com/blog/what-is-a-service-mesh
Service Mesh
Visão geral
Sem Com Service Mesh
Service Mesh
Istio
Is an open source Service Mesh that layers transparently onto existing distributed applicationsistio.io
Service Mesh
Istio
Algumas funcionalidades
- Comunicação segura entre serviços via TLS, autenticação e autorização
- Balanceamento de carga automático para HTTP, gRPC, WebSocket e TCP
- Controle de tráfego através de roteamento, retentativas, injeção de falhas, Circuit breaker, versionamento e mais
- Observabilidade com coleta automática de métricas, logs e traces do tráfego
Service Mesh
Hands-on
Service Mesh
Hands-on
Instalando o Istio
Seguindo a documentação em istio.io:
                            $ curl -L https://istio.io/downloadIstio | sh -
                            $ cd istio-1.17.2
                            $ export PATH=$PWD/bin:$PATH
Isso irá adicionar a pasta istio-1.17.2/bin em seu $PATH
temporariamente
Para fazer de forma permanente, você pode colocar o último comando
(export ...) em algum arquivo de seu sistema que seja sempre carregado,
como /etc/profile, ~/.bashrc, ~/.zshrc, entre
outros
Service Mesh
Hands-on
Instalando o Istio
Adicione a label istio-injection=enabled no namespace
default, indicando que queremos injetá-lo automaticamente em todos os recursos da nossa
aplicação, e instale o perfil demo:
                            $ minikube kubectl -- label namespace default istio-injection=enabled
                            $ istioctl install --set profile=demo -y
Saiba mais sobre os outros perfis na documentação
Vamos apagar os pods existentes para que quando o Kubernetes suba novos, o Istio possa injetar seus proxies:
$ minikube kubectl -- delete pods -l app
Service Mesh
Hands-on
Criando o API Gateway
Vamos criar um API Gateway para fazer o roteamento dos nossos serviços:
$ minikube kubectl -- create -f k8s/03-gateway.yml
Service Mesh
Hands-on
Criando o API Gateway
Descubra o IP do istio-ingressgateway:
                            $ minikube kubectl -- get service istio-ingressgateway -n istio-system
                            NAME                   TYPE           CLUSTER-IP       EXTERNAL-IP   PORT(S)                AGE
                            istio-ingressgateway   LoadBalancer   10.101.22.8      10.101.22.8   15021:32023/TCP, ...   1h
E mais uma vez, vamos salvar em uma variável para facilitar o uso:
$ export URL_GATEWAY=http://10.101.22.8
Service Mesh
Hands-on
Criando o API Gateway
Vamos testar o roteamento:
                            $ curl -H "Authorization: Bearer ${TOKEN}" "${URL_GATEWAY}/posts"
                            $ curl -H "Authorization: Bearer ${TOKEN}" "${URL_GATEWAY}/comments"
                            $ curl -H "Authorization: Bearer ${TOKEN}" "${URL_GATEWAY}/composition"
Service Mesh
Hands-on
Retentativas automáticas e timeout
Abra um novo terminal para aplicar as regras e acompanhar os logs:
                            $ minikube kubectl -- apply -f k8s/04-retry.yml
                            $ minikube kubectl -- logs -f -l "app=posts"
Volte ao terminal anterior e faça consultas simulando falhas intermitentes:
$ curl -H "Authorization: Bearer ${TOKEN}" -H "X-Fail: 1" "${URL_GATEWAY}/posts"
Veja nos logs que o próprio Service Mesh refaz a consulta ao serviço
istio.ioService Mesh
Hands-on
Lançamento gradual de versões
Altere algo no sistema de postagens e gere uma nova versão do Docker e aplique as regras:
                            $ docker build -t posts:0.0.2 posts
                            $ minikube kubectl -- apply -f k8s/05-shifting.yml
Faça requisições ao serviço e veja algumas indo para a nova versão:
                            $ curl -s -D- -H "Authorization: Bearer ${TOKEN}" -o /dev/null \
                                "${URL_GATEWAY}/posts"
Chaos Engineering
Chaos Engineering
Conceito
Processo de testar um sistema para garantir que ele pode resistir a interrupções inesperadasTech Target
The best way to avoid failure is to fail constantlyNetflix
Chaos Engineering
Conceito
Quebrar um sistema com a proposta de coletar informações que vão ajudar a melhorar a resiliência do sistema
É uma abordagem de teste para software e garantia de qualidade, sendo adequado a sistemas distribuídos e processos modernos
Tech TargetChaos Engineering
Conceito
Quanto maior e mais complexo o sistema, mais imprevisível e caótico será seu comportamento
Estes experimentos geram intencionalmente condições turbulentas em um sistema distribuído para testá-lo e encontrar suas fraquezas
Tech TargetChaos Engineering
Objetivo
Identificar fraquezas em um sistema através de experimentos controlados, que introduzem comportamentos randômicos e imprevisíveis
Tech TargetChaos Engineering
Resultados possíveis
- Pontos cegos
- Locais onde o software de monitoramento não pode coletar dados adequados
- Bugs escondidos
- Falhas e outros problemas que podem causar mal funcionamento do software
- Gargalos de performance
- Situações nas quais eficiência e performance poderiam ser melhoradas
Tech Target
Chaos Engineering
Ferramentas
- Simian Army ARQUIVADO
- Coleção de ferramentas lançada pela Netflix para automatizar testes de caos
- Chaos Monkey
- Desativa instâncias aleatoriamente causando falhas no sistema
- Kube Monkey
- Versão do Chaos Monkey para Kubernetes
- Gremlin
- Funciona com AWS e Kubernetes e para os experimentos se detectar riscos
- AWS Fault Injection Simulator
- Serviço totalmente gerenciado também com proteções para evitar problemas
Chaos Engineering
Hands-on
Chaos Engineering
Hands-on
Abra um novo terminal para acompanhar os logs:
$ minikube kubectl -- logs -f service/istio-ingressgateway -n istio-system
Volte ao terminal anterior, aplique a regra para adicionar delay e abortar requisições aleatoriamente e teste os comentários:
                            $ minikube kubectl -- apply -f k8s/06-fault.yml
                            $ curl -H "Authorization: Bearer ${TOKEN}" "${URL_GATEWAY}/comments"
Nota: no Istio, não é possível injetar falha e utilizar retry / timeout no mesmo serviço (ver documentação)
Chaos Engineering
Hands-on
Reaplique a regra padrão do API Gateway para desconsiderar as falhas:
$ minikube kubectl -- apply -f k8s/03-gateway.yml
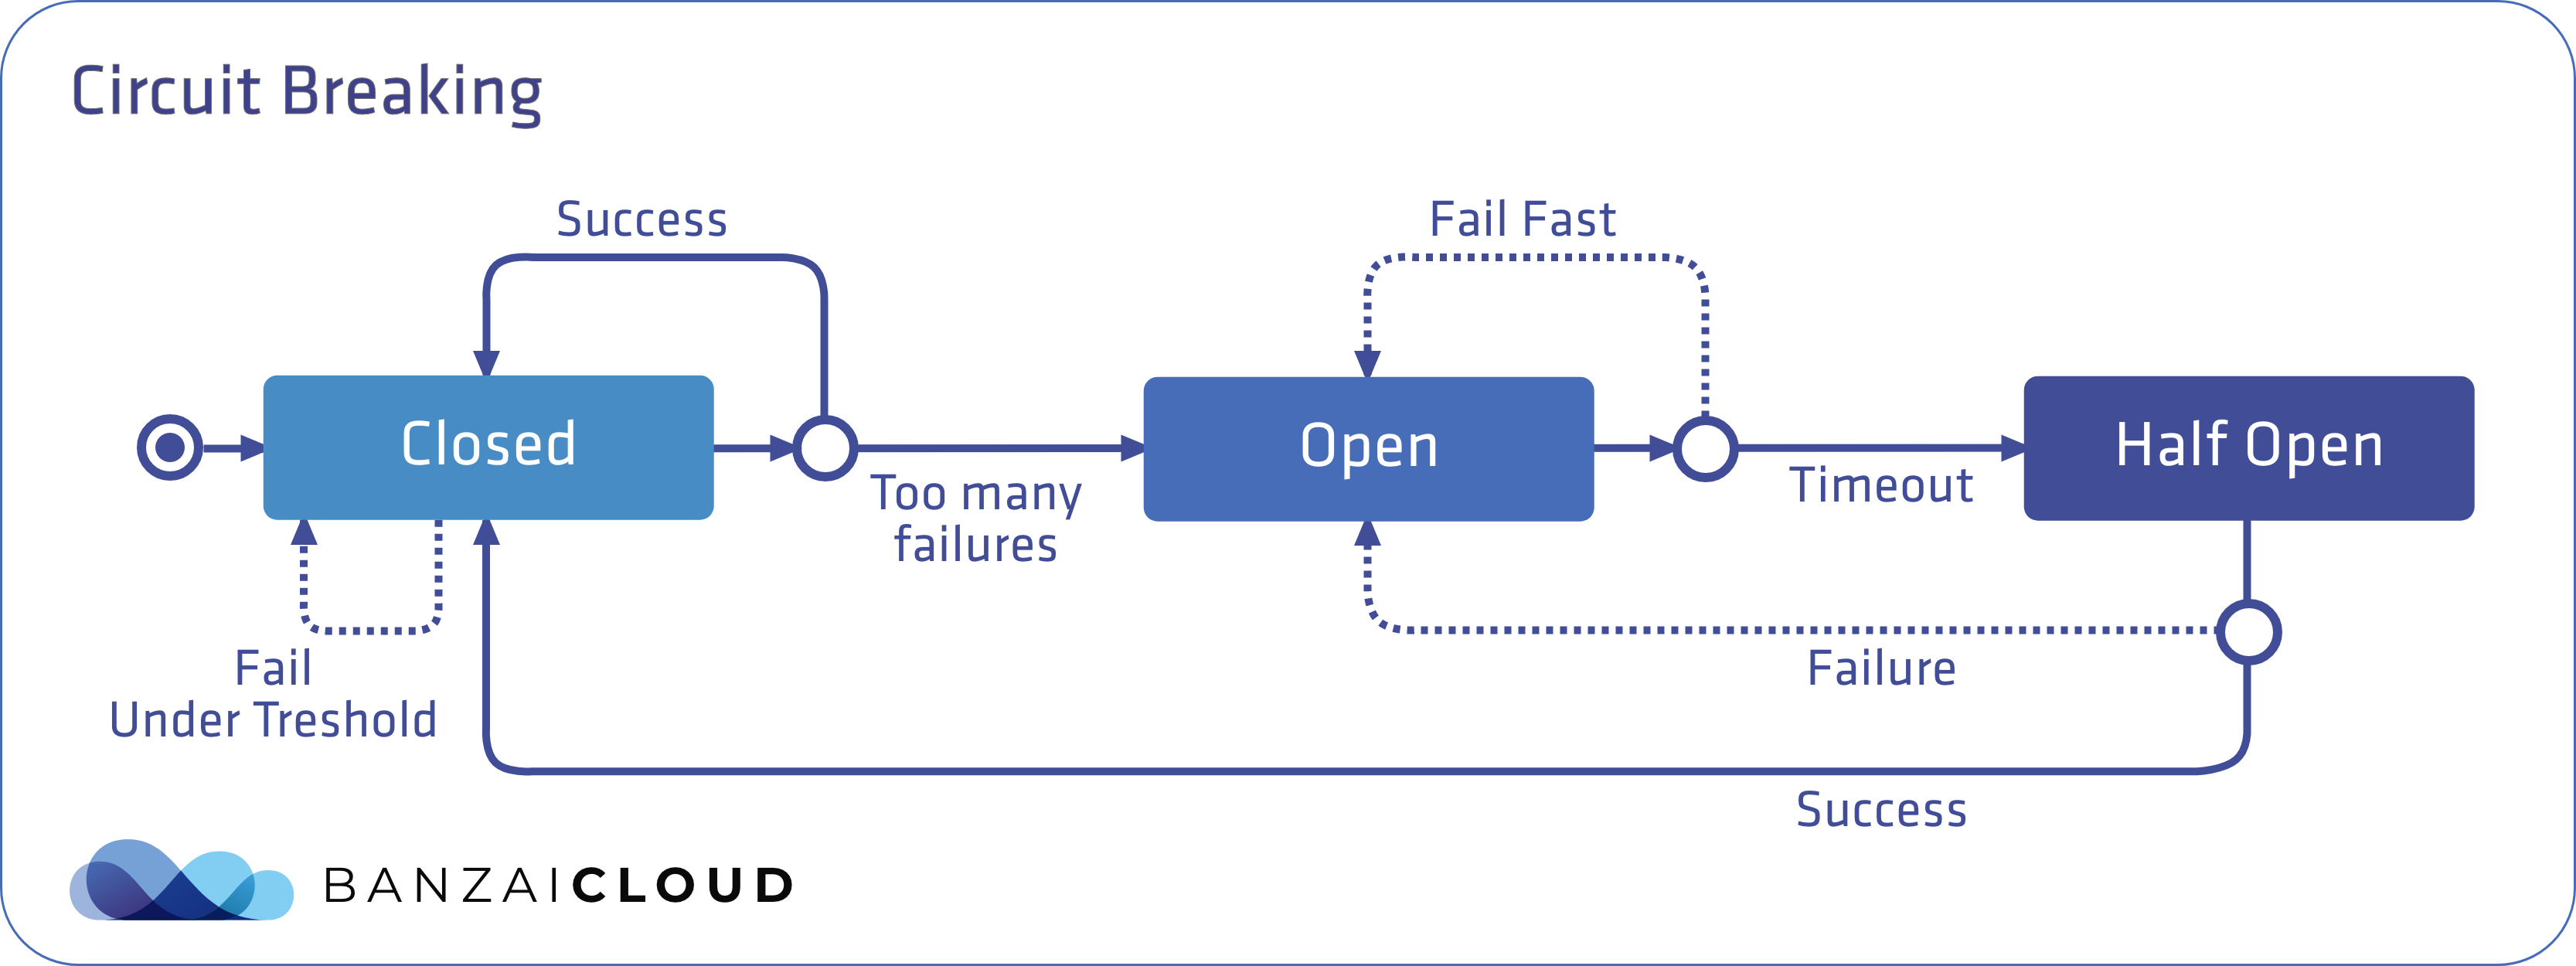
Circuit Breaker
Circuit Breaker
Conceito
Design pattern para criar microsserviços resilientes limitando o impacto de falhas e latências nos serviços
Um de seus objetivos básicos é lidar com falhas de forma graciosa para que não ocorram o cascateamento para outros serviços
Em um ambiente de microsserviços, falhar rapidamente é críticodzone.com
Circuit Breaker
Conceito
Circuit Breaker
Conceito
Circuit Breaker
Hands-on
Circuit Breaker
Hands-on
Aplique a regra que irá evitar que o serviço de composição fique lento por causa de falhas na postagem:
                            $ minikube kubectl -- apply -f k8s/07-circuit-breaker.yml
                            $ curl -D- -H "X-Sleep-Fail: 1" -H "Authorization: Bearer ${TOKEN}" \
                                "${URL_GATEWAY}/composition"
Acompanhe em um outro terminal:
$ minikube kubectl -- logs -f -l app
Observabilidade
Observabilidade
Conceito
Processo que usa ferramentas de software para detectar problemas, observando as entradas e saídas da pilha de tecnologia. As entradas incluem pilhas de aplicação e infraestrutura, enquanto as saídas incluem transações de negócios, experiências de usuário e desempenho de aplicações.cisco.com
Observabilidade
Hands-on
Observabilidade
Hands-on
Instalando o Kiali (dashboard), Prometheus (métricas), Grafana (monitoramento) e Jaeger (tracing distribuído):
                            $ minikube kubectl -- create -f <caminho-para-o-istio>/samples/addons
                            serviceaccount/grafana configured
                            configmap/grafana configured
                            service/grafana configured
                            deployment.apps/grafana configured
                            ...
Para abrir o Kiali no navegador, execute o comando abaixo e acesse o endereço informado:
                            $ istioctl dashboard kiali
                            http://localhost:20001/kiali
Kubernetes na Cloud
Kubernetes na Cloud
Serviços
Dentre os diversos provedores de cloud existentes (sendo os três principais Amazon Web Services, Google Cloud Platform e Microsoft Azure), escolhi a AWS por sua menor complexidade e ampla aceitação no mercado
Kubernetes na Cloud
Serviços
O Kubernetes foi criado inicialmente pelo Google, então o seu serviço Google Kubernetes Engine (GKE) é bastante recomendado
Entretanto, eu acho o painel do Google Cloud um pouco confuso e, por isso, vou demonstrar como usar Kubernetes na Amazon Web Services
Kubernetes na AWS
Serviços
Existem dois principais serviços na AWS para lidar com clusters:
- Elastic Kubernetes Services (EKS): implementação de clusters Kubernetes nos serviços da Amazon
- Elastic Container Services (ECS): serviço próprio da AWS para criação de clusters (ou seja, um produto "alternativo" ao Kubernetes)
Iremos utilizar o EKS, mas para saber mais sobre a diferença entre eles e qual utilizar, leia o artigo Amazon ECS vs Amazon EKS: making sense of AWS container services
Kubernetes na AWS
Infrastructure as a Code
Usaremos o
AWS CloudFormation
para provisionar as nossas instâncias e a biblioteca eksctl para criar as
stacks necessárias
Kubernetes na AWS
Hands-on
Hands-on na AWS
Instalação das ferramentas
-
Instale as ferramentas
kubeadm,kubeletekubectlpara gerenciar o cluster em kubernetes.io/docs/setup -
Instale o utilitário
awspara comunicação com os serviços da Amazon em aws.amazon.com/cli -
Instale o
eksctlpara manuseio do cluster em eksctl.io
Hands-on na AWS
Autenticação
Para se comunicar com a AWS, crie o arquivo ~/.aws/credentials e configure-o
com as informações recebidas para seu usuário, como visto abaixo:
                            [default]
                            aws_access_key_id=Access Key recebida
                            aws_secret_access_key=Secret Key recebida
                            region=us-east-1
Os usuários foram criados seguindo a recomendação
Minimum IAM Policies
do eksctl
Hands-on na AWS
Criação do cluster
                            $ eksctl create cluster \
                                --region us-east-1 \
                                --zones "us-east-1a,us-east-1b,us-east-1c,us-east-1d,us-east-1f" \
                                --node-type t2.medium \
                                --nodes-min 1 \
                                --nodes-max 3 \
                                --with-oidc \
                                --asg-access \
                                --name workshop-<USERNAME>
Essa operação demora até 30 minutos para completar, por isso já foi feita!
Hands-on na AWS
Criação do cluster
                            $ eksctl create cluster # ...
                            2022-07-15 06:52:04 [ℹ]  eksctl version 0.105.0
                            2022-07-15 06:52:04 [ℹ]  using region us-east-1
                            2022-07-15 06:52:04 [ℹ]  subnets for us-east-1a - public:192.168.0.0/20 private:192.168.80.0/20
                            2022-07-15 06:52:04 [ℹ]  subnets for us-east-1b - public:192.168.16.0/20 private:192.168.96.0/20
                            2022-07-15 06:52:04 [ℹ]  subnets for us-east-1c - public:192.168.32.0/20 private:192.168.112.0/20
                            2022-07-15 06:52:04 [ℹ]  subnets for us-east-1d - public:192.168.48.0/20 private:192.168.128.0/20
                            2022-07-15 06:52:04 [ℹ]  subnets for us-east-1f - public:192.168.64.0/20 private:192.168.144.0/20
                            2022-07-15 06:52:04 [ℹ]  nodegroup "ng-333b9ef5" will use "" [AmazonLinux2/1.22]
                            2022-07-15 06:52:04 [ℹ]  using Kubernetes version 1.22
                            2022-07-15 06:52:04 [ℹ]  creating EKS cluster "workshop-1" in "us-east-1" region with managed nodes
                            2022-07-15 06:52:04 [ℹ]  will create 2 separate CloudFormation stacks for cluster itself and the initial managed nodegroup
                            2022-07-15 06:52:04 [ℹ]  if you encounter any issues, check CloudFormation console or try 'eksctl utils describe-stacks --region=us-east-1 --cluster=workshop-1'
                            2022-07-15 06:52:04 [ℹ]  Kubernetes API endpoint access will use default of {publicAccess=true, privateAccess=false} for cluster "workshop-1" in "us-east-1"
                            2022-07-15 06:52:04 [ℹ]  CloudWatch logging will not be enabled for cluster "workshop-1" in "us-east-1"
                            2022-07-15 06:52:04 [ℹ]  you can enable it with 'eksctl utils update-cluster-logging --enable-types={SPECIFY-YOUR-LOG-TYPES-HERE (e.g. all)} --region=us-east-1 --cluster=workshop-1'
                            2022-07-15 06:52:04 [ℹ]
                            2 sequential tasks: { create cluster control plane "workshop-1",
                                2 sequential sub-tasks: {
                                    4 sequential sub-tasks: {
                                        wait for control plane to become ready,
                                        associate IAM OIDC provider,
                                        2 sequential sub-tasks: {
                                            create IAM role for serviceaccount "kube-system/aws-node",
                                            create serviceaccount "kube-system/aws-node",
                                        },
                                        restart daemonset "kube-system/aws-node",
                                    },
                                    create managed nodegroup "ng-333b9ef5",
                                }
                            }
                            2022-07-15 06:52:04 [ℹ]  building cluster stack "eksctl-workshop-1-cluster"
                            2022-07-15 06:52:07 [ℹ]  deploying stack "eksctl-workshop-1-cluster"
                            2022-07-15 06:52:37 [ℹ]  waiting for CloudFormation stack "eksctl-workshop-1-cluster"
                            2022-07-15 07:05:21 [ℹ]  building iamserviceaccount stack "eksctl-workshop-1-addon-iamserviceaccount-kube-system-aws-node"
                            2022-07-15 07:05:22 [ℹ]  deploying stack "eksctl-workshop-1-addon-iamserviceaccount-kube-system-aws-node"
                            2022-07-15 07:05:22 [ℹ]  waiting for CloudFormation stack "eksctl-workshop-1-addon-iamserviceaccount-kube-system-aws-node"
                            2022-07-15 07:05:53 [ℹ]  waiting for CloudFormation stack "eksctl-workshop-1-addon-iamserviceaccount-kube-system-aws-node"
                            2022-07-15 07:05:53 [ℹ]  serviceaccount "kube-system/aws-node" already exists
                            2022-07-15 07:05:53 [ℹ]  updated serviceaccount "kube-system/aws-node"
                            2022-07-15 07:05:54 [ℹ]  daemonset "kube-system/aws-node" restarted
                            2022-07-15 07:05:54 [ℹ]  building managed nodegroup stack "eksctl-workshop-1-nodegroup-ng-333b9ef5"
                            2022-07-15 07:05:55 [ℹ]  deploying stack "eksctl-workshop-1-nodegroup-ng-333b9ef5"
                            2022-07-15 07:05:55 [ℹ]  waiting for CloudFormation stack "eksctl-workshop-1-nodegroup-ng-333b9ef5"
                            2022-07-15 07:06:26 [ℹ]  waiting for CloudFormation stack "eksctl-workshop-1-nodegroup-ng-333b9ef5"
                            2022-07-15 07:07:05 [ℹ]  waiting for CloudFormation stack "eksctl-workshop-1-nodegroup-ng-333b9ef5"
                            2022-07-15 07:08:36 [ℹ]  waiting for CloudFormation stack "eksctl-workshop-1-nodegroup-ng-333b9ef5"
                            2022-07-15 07:09:32 [ℹ]  waiting for CloudFormation stack "eksctl-workshop-1-nodegroup-ng-333b9ef5"
                            2022-07-15 07:10:58 [ℹ]  waiting for CloudFormation stack "eksctl-workshop-1-nodegroup-ng-333b9ef5"
                            2022-07-15 07:10:58 [ℹ]  waiting for the control plane availability...
                            2022-07-15 07:10:58 [✔]  saved kubeconfig as "/home/vcampitelli/.kube/config"
                            2022-07-15 07:10:58 [ℹ]  no tasks
                            2022-07-15 07:10:58 [✔]  all EKS cluster resources for "workshop-1" have been created
                            2022-07-15 07:10:59 [ℹ]  nodegroup "ng-333b9ef5" has 1 node(s)
                            2022-07-15 07:10:59 [ℹ]  node "ip-192-168-55-234.ec2.internal" is ready
                            2022-07-15 07:10:59 [ℹ]  waiting for at least 1 node(s) to become ready in "ng-333b9ef5"
                            2022-07-15 07:10:59 [ℹ]  nodegroup "ng-333b9ef5" has 1 node(s)
                            2022-07-15 07:10:59 [ℹ]  node "ip-192-168-55-234.ec2.internal" is ready
                            2022-07-15 07:11:00 [ℹ]  kubectl command should work with "/home/vcampitelli/.kube/config", try 'kubectl get nodes'
                            2022-07-15 07:11:00 [✔]  EKS cluster "workshop-1" in "us-east-1" region is ready
Hands-on na AWS
Criação do cluster
Configuração do kubectl
Ao criarmos o cluster no passo anterior, o eksctl irá automaticamente
gerar o arquivo ~/.kube/config (responsável por fornecer as configurações
ao kubectl)
Se você sobrescreveu este arquivo ou se o cluster não foi criado a partir da
máquina atual que você irá executar o kubectl, você pode gerá-lo com:
$ eksctl utils write-kubeconfig --cluster <nome>
Hands-on na AWS
Criação do cluster
Checagem
Para verificar os nós que foram criados, execute:
$ kubectl get nodes
Hands-on na AWS
Criação de chaves de criptografia
Iremos utilizar o Amazon Key Management Service (KMS) para criptografar as imagens do Docker
Para criar uma chave de criptografia, podemos utilizar o comando
aws kms create, mas ele é um pouco complexo, então geralmente faremos isso via
interface
Você irá receber o ARN da chave que foi criada para seu usuário
Hands-on na AWS
Imagens dos containers
Devemos fazer o build build das imagens do Docker necessárias e o push para o Amazon Elastic Container Registry (ECR), que é o serviço de registro de imagens
Hands-on na AWS
Imagens dos containers
Criar repositório
                            $ export W_KMS=<ARN-RECEBIDA>
                            $ export W_USERNAME=<USERNAME>
                            $ export W_ACCOUNT=<CONTA>
                            $ aws ecr create-repository \
                                --repository-name workshop-${W_USERNAME} \
                                --encryption-configuration encryptionType=KMS,kmsKey=${W_KMS}
Hands-on na AWS
Imagens dos containers
Push de imagens
                            $ aws ecr get-login-password --region us-east-1 | \
                                docker login --username AWS \
                                --password-stdin ${W_ACCOUNT}.dkr.ecr.us-east-1.amazonaws.com

                            $ docker build -t workshop-${W_USERNAME} ${W_APP}/

                            $ docker tag workshop-${W_USERNAME}:latest \
                                ${W_ACCOUNT}.dkr.ecr.us-east-1.amazonaws.com/workshop-${W_USERNAME}:latest

                            $ docker push \
                                ${W_ACCOUNT}.dkr.ecr.us-east-1.amazonaws.com/workshop-${W_USERNAME}:latest
Hands-on na AWS
Configuração do cluster
-
Edite o arquivo
k8s/aws/posts.ymle:-
Substitua o caminho da imagem na linha 28 com a URL completa recebida após o
push -
Exemplo:
"1234567890.dkr.ecr.us-east-1.amazonaws.com/workshop-vinicius"
-
Substitua o caminho da imagem na linha 28 com a URL completa recebida após o
-
Aplique as configurações via
kubectl:$ kubectl create -f k8s/aws/posts.yml
Hands-on na AWS
Checagem
Para verificar os serviços e deployments criados, execute:
                            $ kubectl get services
                            $ kubectl get deployments
Hands-on na AWS
Atualização da aplicação
Caso queira atualizar a aplicação, um novo build de imagens deve ser feito e um
kubectl rollout restart deployment deve ser executado
                            $ docker build -t workshop-${W_USERNAME} posts/

                            $ docker tag workshop-${W_USERNAME}:latest \
                                ${W_ACCOUNT}.dkr.ecr.us-east-1.amazonaws.com/workshop-${W_USERNAME}:latest

                            $ docker push \
                                ${W_ACCOUNT}.dkr.ecr.us-east-1.amazonaws.com/workshop-${W_USERNAME}:latest

                            $ kubectl rollout restart deployment ${W_APP}-deployment
Hands-on na AWS
Bônus: Cluster Autoscaler
-
Siga os passos do artigo
Cluster Autoscaler
-
Ao contrário do que diz o artigo, o
eksctlnão cria mais uma role de AutoScaling, mas sim acopla uma policy inline com sufixoPolicyAutoScaling - É preciso então criar uma role manualmente a partir da política inline que foi acoplada ao node
-
Ao contrário do que diz o artigo, o
Hands-on na AWS
Bônus: Cluster Autoscaler
-
Crie um deployment
$ kubectl create -f k8s/cluster-autoscaler.yml -
Escale manualmente o deployment
$ kubectl scale --replicas=10 deployment/nginx -
Acompanhe os logs do autoscaler
$ kubectl -n kube-system logs -f deployment/cluster-autoscaler -
Em outro terminal, acompanhe os pods
$ kubectl get pods -l app=nginx -o wide --watch
Referências
Obrigado!